Quick Guide Selection:
Beginning Tutorials Intermediate TutorialsWelcome to my warp editing tutorial, if you're reading this, chances are you're stumped on how to use the warp editor tool in ZOLE. Well worry not, after a read through this tutorial you'll set out on a journey and become a warp master, of course if you still have troubles don't be afraid to ask a question here or on the IRC. (irc.caffie.net #ZOLE)
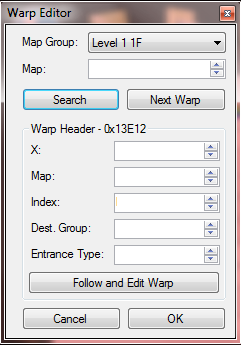
Let's start by learning what most of the value boxes are in the warp editor for a basic warp. When you open the warp editor, you'll be prompted to search whatever map you are on for warps. You can change what map you want to check warps for using the map group drop down list and the map value. Once you find a map with a warp, the most common thing you'll see is this, (Mind you, there are other "versions" such as side scrolling maps and type 40 warps, which get discussed later.)
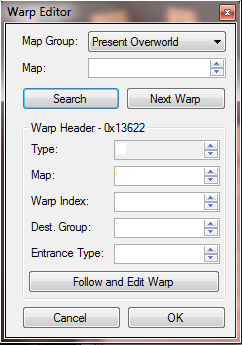
Of course, you will see actual values in the boxes. Starting from the top, heres a quick rundown of what each box actually is, from top to bottom:
Type - This tells you what type of warp you are editing. It is actually uneditable, so you don't need to worry about it. However there are only certain types of warps that can do things, and sometimes you will need to grab a specific warp type to make your warp work. For basic warps its usually not a worry however it should be noted that type 0 is what you would use with stairs and as over world warps. Type 4 generally falls in with doors (exits) on the indoor maps/dungeons. There is also type 40 which is a group of position specific warps. If you find your warp is not working, it might be a good idea to try switching the type of warp you are using.
Map - This is the map the warp is currently located on, you'd change this value if you wanted to have the warp moved onto another map.
Warp Index - This is the warp index. I cannot really explain it otherwise, but dont worry about as this value rarely (if not never) gets messed with when editing a warp.
Destination (Dest) Group - This in a nutshell is basically what map group the warp will teleport you to. However there are things to know about what values go here:
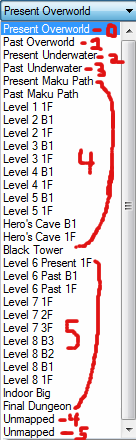
Present Overworld - 0
Past Overworld - 1
Present Underwater - 2
Past Underwater - 3
Maku Path up to and including the Black Tower - 4
Level 6 up to and including the Final Dungeon - 5
First Unmapped - 4
Second Unmapped - 5
There is also a 6th and 7th destination group, which is side warp maps. If you make a warp leading to a side warp map, make sure its destination group is 6 or 7 or the side warp map itself will "break". Destination group 6 is used for the dungeon maps found in the map group 4 (destination group 4 if you will) while 7 is used in map group 5 (destination group 5).
Entrance Types - The entrance type changes what happens when you enter the warp, as far as I know it is not necessary to edit, however it is best you change the value regardless.
Stairs - 2
Indoor entrances/exits - 3
Caves, Outside Doors and pretty much everything else - 4
Now once you click the follow and edit warp button, a new window will pop up, and it will generally look like this:
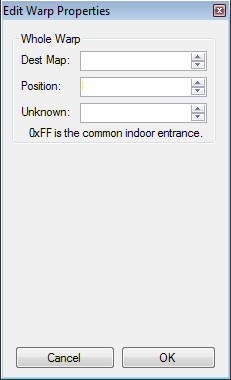 Destination (Dest) Map
 - This is the map your warp will lead to.
Position - The actual spot link will appear on when warped. It is in YX format, so if you want link to appear on X: 6 and Y: 2, then you would write 26 as the value. If you put the position as FF it will act as a common dungeon entrance where link enters and moves forward, ONLY if you have the unknown value set to 93. (upwards)
(As of 1.26 this is titled Entry)
Unknown- Although this isn't exactly what the unknown value is, what it generally does is changes how link enters the said room being warped to, some values you might want to know when editing this are:
Facing Upwards - 93
Facing Downwards - F3
Falling from the ceiling - 0B
Otherwise just mess with the values until you find some, maybe in the future I will add more. If you would like to read an example edit of a basic warp, scroll down and see what steps to do.
~~~~~~~~~~~~~~~~~~~~~~~~~~~~~
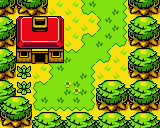
Basic Warp ExampleNow that you know what you will be working with, lets try editing a warp. For this demonstration I will be using the warp on map 57 of the present overworld, on map 8A of the present overworld. If you wish to follow along with the demonstration, go to map 57 and in the second map value, change it to 8A. This will then relocate the warp onto map 8A.
From here I can select any tile that is used as a means of warping in the game as my warp tile. I shall use tile DE, a regular door. It doesnt matter where you place the warp on the map, as it will work regardless. Test it out and you will see the warp is successful. Here is what my map looks like:
However, I want the warp to take me to a whole different map and, the map it takes me to, to return me to map 8A. I will start off by find a map to use, which will be map 4 of the Present Maku Path. I will go into the warp editor on map 4 and because the destination group is already set to the present overworld I have no need to change it.
However I will click follow and edit warp and then change the destination map to 8A because that is the map I am using and then the position to 32 because my X value is 2 and the Y is 3, combined giving a YX of 32. It is not necessary to change the unknown value from 1 because in this situation it will still cause Link to face downwards, however the value 1 does not always do this, so if you wish for a guarenteed downwards direction change it F3.
Now that I am finished with that warp I can move onto the warp located back on map 8A. In the warp editor I must change the destination group from 3 to 4, otherwise I would not end up at the Maku Path when I use the warp, but rather a map with a big M on it. I can now go to follow and edit warp and change my destination map to 4, and keep my position at FF, but change the unknown value to 93 because if it is kept at 4 Link will actually appear at the corner of the map, rather then coming through the middle and walking forward.
And thats all that needs to be done, test out your game and you will find the warps working perfectly.
~~~~~~~~~~~~~~~~~~~~~~~~~~~~~
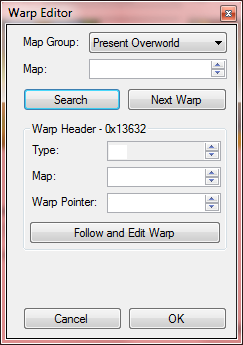
Side Scrolling WarpsGo to any side scrolling map in the game, open the warp editor and click search? What do you see? A warp box very similar to the most common (basic) warp:
Now I know what you are thinking. "Whoa, whoa, whoa! What is this X value! I can't work with it!!" Well think again Benegen, you can and you shall succeed!
Essentially what the X-value does, is it determines what side your warp will actually work on. If you try just adding a warp and expecting it to work on both top and bottom of the room then you'll be surprised. Imagine a side scrolling room cut into quarters: Top Left, Top Right, Bottom Left and Bottom Right. Depending on what you put as the value, will depend on which side the warp works on. The values for this are:
1 - Top Left Side
2 - Top Right Side
3 - Top Left and Right Sides
4 - Bottom Left Side
5 - Top Left and Bottom Left Sides
6 - Top Right and Bottom Left Sides
7 - Top Left, Top Right and Bottom Left Sides
8 - Bottom Right Side
9 - Top Left and Bottom Right Sides
A - Top Right and Bottom Right Sides
B - Top Left, Top Right and Bottom Right Sides
C - Bottom Left and Bottom Right Sides
D - Top Left, Bottom Left and Bottom Right Sides
E - Top Right, Bottom Left and Bottom Right Sides
F - All Sides
Other then the X value, side scrolling warps are the exact same as basic, regular warps. Simply ignore the index value, change the map value if needed and edit the destination, position ect. Scroll down for an example on editing a side scrolling warp if you are not sure how to approach editing one.
~~~~~~~~~~~~~~~~~~~~~~~~~~~~~
Side Scrolling Warp ExampleExample Time!

Alright to start off, I shall be using the side scrolling map 10 on level 1. For this demonstration I will move the warp over to the bottom right side of the screen, as well as what map it goes to.
Start off by opening the warp editor. Here I will change the value in the X box from 1 to 8 because this will allow link to walk off the bottom right of the map. There is no need for me to change my destination group because level 1 is contained in 4 already. Here is what my map looks like:
From here I will go to follow and edit warp and change the destination map to 24 because for this tutorial that is what map I will use. I then set up what position I would like, in YX form, in this case 87, which will lead to the front door in level 1. If I would like to change links position I would, but I shall leave it the same.
Test out the warp and you will find it works perfectly. If I wanted to set up a warp into my side scrolling room I would just simply follow the basic warp tutorial, except make sure to change the destination group to 6 (not 7 because level 1 is in map group 4, not 5) otherwise the map will break.
~~~~~~~~~~~~~~~~~~~~~~~~~~~~~
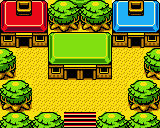
Type 40 WarpsSo you might be wondering, what is a type 40 warp? Well a type 40 warp isn't actually a warp, but rather a group of position specific warps. So what is the benefits of this? Well obviously this allows us for multiple, warps that happen in a certain spot on a map. Type 40 warps can be found on maps with multiple warps, such as map 68 on the present overworld (Shop Map). Open up the warp editor and you'll get these screens:
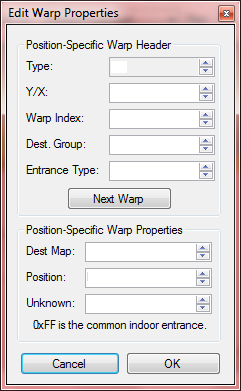
If you have read the basic warp section of this guide then there is really only two new things to learn here, and those are the Warp Pointer and the Y/X. The warp pointer is exactly what the title says, and it doesn't need to be altered in anyway.
The Y/X however, is the position the actual warp will be located , in YX form if that wasn't obvious. An example would be 25 used as the first value on map 68. If you check the map out and go to Y:2 X:5 you will find a door to the shop. Also remember, just having a position set does not make that one spot on the map a warp, you have to have one of the many appropriate tiles set as well.
The next warp button, if not again obvious, will go to the next warp found in that specific type 40 one. Keep in mind that when editing warps, you must click ok on both warp editing screens to save the progress of the warp you edited, meaning you can't edit all of them then click ok, otherwise they won't all get saved, just the last one you click ok on. And that all there is to know about type 40 warps really, scroll down for an example edit if you are still a little unsure about how to approach editing one.
~~~~~~~~~~~~~~~~~~~~~~~~~~~~~
Type 40 Warp ExampleWelcome to the type 40 example, in this example I will be using the type 40 warp on map 68 of the present overworld and I will demonstrate moving it to other maps as well as changing all the warps to different areas.
To start off, go to map 68 of the present overworld, open up the warp editor and hit search. I will then edit the map value to 8A which will move all the warps over to that map. From here I will go over to map 8A and open the warp editor and proceed to edit the actual warps. To start off, I would choose what parts of my map I would like the warp entrances to be. I will use all 4 warps found in this type 40, and the positions (YX of course) will be (from first warp to last): 21, 28, 44 and 45. Here is what my map looks like:
From here, I would then decide what maps I want each warp to lead to, and edit the destination groups for each warp accordingly. I chose the level 1's entrance map 24 (destination group 4) for my first warp. Level 2's entrance map 46 (also destination group 4) as my second warp. Past overworld map 58 (destination group 1) as my third warp and then present underwater map F8 (destination group 20) as my fourth and final warp. The positions used from warp 1 to 4 are: FF, FF, 32 and FF.
The unknowns are just: 93, 93, F3 (I could have left this as it was, it really doesn't matter) and 93.
Test this out in game and you will find the warps work perfectly. If you want to make the warps lead back to the same map, you would just follow my basic warp tutorial on those said maps.
~~~~~~~~~~~~~~~~~~~~~~~~~~~~~
Type 40 Warp + Basic WarpWarning this is an intermediate tutorial, if there is anything you don't understand about the previous lessons, it is best you clarify your understanding of them before attempting to do this. If you are lucky, this will be easy, if you are not then it can be frustrating.Welcome to the first intermediate warp tutorial, in this tutorial I will try to help you get a better understanding on how to pull of a room with both a type 40 warp and a regular warp.
This can only be done on indoor maps, the main one being Indoor Big. I recommend only doing this in Indoor Big.When trying to pull off this 2nd rate witchcraft there are a few things you will have to be aware of. Previously I mentioned about not worrying about the type of warps being used, and that is true for regular warp activities, but for what we are doing you will need to be using a type 4 warp. It is possible that you might not need to but I would stick with a type 4 warp for safety. The second thing you need to be aware of is what type 40 warp you are using. Warps are set up in a way so that lower numbered maps with warps take priority over higher numbered maps with warps. This in mind, when trying to pull this off you will always need to use a warp that is before (so it takes priority over the type 40 warp) the type 40 warp. If you do not then you will not be able to leave the entrance through a warp but rather by just walking down to the map directly below it.
Now heres an example to try yourself. Start of by going to the indoor big room, map D8. Edit the warp and move it into D9, we will not be using it. Since there are a bunch of lame old mini-game interactions on map D8, go ahead and delete them and alter the map to your liking. Now what we are going to do is head on to map CC and steal the type 40 warp from there, when you first search for a warp you will only see a type 4, simply click next warp and you will find a type 40 there. Move the type 40 over to map D8.
D8 should now contain one warp, that being the type 40 we had just moved over. Now you may have noticed that the room we just took the type 40 warp from was a room using a basic warp and the type 40, and if you were paying attention then you'd know that the basic warp was in fact a type 4 that took priority over the type 40 hence it being the first in the list. We are going to replicate that using a different type 4 warp. To do this we
MUST use a type 4 warp from a map before CC, otherwise the type 40 warp will take priority. We could use the warp from CC itself which would make a lot more sense, but for demonstration purposes I am not going to. Now there is only a handful of maps using a type 4 warp behind CC, such as map C0 and C7. Lets just go ahead and steal the warp from C7. Simply move it over to map D8.
Now go back to map D8, and search for warps. You should see a type 4 warp appear, if not you have done something wrong. You might notice when you hit next warp you don't actually see the type 40 warp afterwards, don't worry about this, this is just because of the order of warps on the map and such, if you continuously click next warp you will eventually come to the point where you see the type 40 warp on map D8.
Go in game head to the maps you set up and you will see it works splendidly. That is all for this tutorial, hopefully you didn't fail at it.


