READ:Welcome to the Ultimate ZOLE 4 Basic Tutorial collection, all of which are written by myself (Fatories). Below is a table of contents where you can select which tutorial you would like to view, if you are new to ZOLE 4 I suggest starting from the beginning. More tutorials will be added periodically.
~~~~~~~~~~~~~~~~~~~~~~~~~~~~~
Table of Contents:
~~~~~~~~~~~~~~~~~~~~~~~~~~~~~
Booting ZOLE 4ZOLE 4 as you should already know is a program devoloped by Lin for the hacking of The Legend of Zelda Oracle games. If you are going to hack the oracle games, then there is no better tool than ZOLE (or any for that matter:P). To download ZOLE you will gave to go to the main ZOLE topic which can be found under the ZOLE board, then by clicking the "ZOLE 4 Version X.xx Released!"
A direct link would be:
http://zeldahacking.ulmb.com/index.php?topic=2.0You will need a program that allows you to open and extract ".zip" files as that is what ZOLE is contained in. Now a days I believe most operating systems come with one already, however if yours does not then what you can do is go onto Google (I pray to god you know what that is) and search for WinRar. WinRar is a program that will allow you to access .zip files and various other files, for "free". You will also need an Oracles game ROM to use in ZOLE, for that just remember. Google.
With that out of the way you can now extract the files out of the ZOLE4.zip into whichever spot you would like it. It will have various components in it, however the two main ones you should look for are the ZOLE4.exe and the GBHL.dll. As long as those are there, you have ZOLE ready for the use.
Run the ZOLE4.exe. A window will pop up with the main ZOLE interface. I will discuss most components individually, so I wont get into what each thing is right now. What we really want is to open our ROM into ZOLE so we can edit it. To do this we will go into the upper left corner click on the "File" menu, then click on "Open Rom". We could also just click the folder with the arrow below the File menu, as well as press Ctrl+O which is the hot key for opening your ROM. After clicking the open ROM button a window will pop up asking you to choose a file, simply go to the directory your ROM is stored in and select it.
Voila, if all went well you'll see something like this.
~~~~~~~~~~~~~~~~~~~~~~~~~~~~~
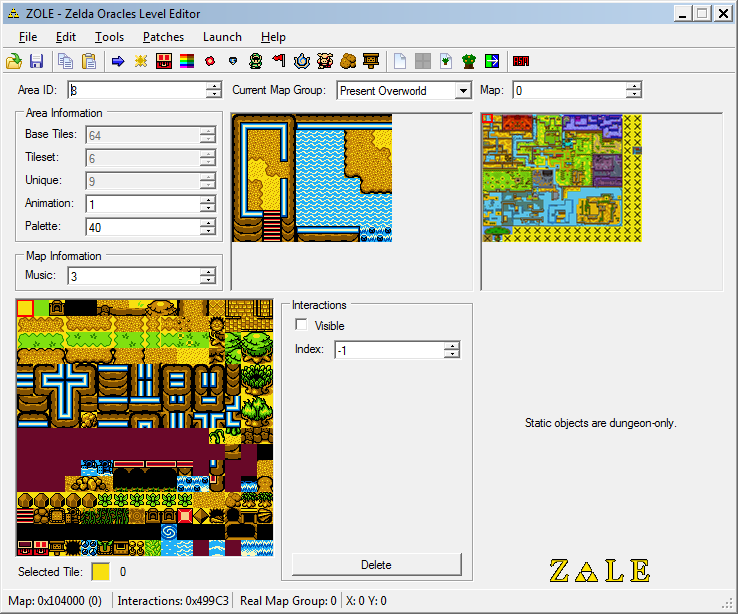
Editing MapsEditing maps is the main part of making a hack. The "map editor" as I will call it, is basically all of the good stuff on the front of ZOLE upon opening.
In the lower left you've got your tile selector. Here you can select tiles to use in your map. The tile ID is the number found beneath it where it says "Selected Tile" To select a tile you simply left click the tile you want. You can select multiple tiles by left clicking and dragging.
Above the tile selector we have the Area Information. Here we can change the pallet of the map, the area ID of the map as well as the animation of the tiles for the map. The Area ID is the ID of the map, and determines what tiles are in the tiles selector. Maps with the same Area ID are affected by tile edits and pallet changes. The pallet is exactly what it sounds like, it changes the pallet of the map. The animation will change what animation certain animation tiles are on, you'll probably never edit this.
To the right of the Area Information you will find the map viewing box which also doubles as the actual map editing box. Here you will be able to tell what map you are on, and edit the map to your liking. To edit a map you will first select a tile from the tile selector, then simply left click where you want it to appear on the map. By right clicking a tile on the map it will set the tile to be selected, and then you can simply left click to use it. Middle clicking (scroll wheel clicking) will fill an area of the map with your selected tile. It will fill every tile that is the same and touches each other directly.
At the bottom of the screen you can see the X and Y values of the tile your mouse is currently hovered over.
Above the map editing box you have a drop down list with a list of all the map groups in the game, named for convenience. This will allow you to go from say the over world maps to the level 1 maps, for editing.
To the right of the map editing box we have the mini map of the map group you are currently in. Here you can easily see which maps are where, and select them for editing by simply left clicking a map. You could also enter the physical map value in the box above it labeled "Map:". To get the map value you'll just have to go to the actual map and then the value will appear in that box.
You can change what music appears on your selected map by going to the box above the tile selector labeled "Music" under the Map information. A list of values that determine what song plays can be found in the list section of the forums.
~~~~~~~~~~~~~~~~~~~~~~~~~~~~~
Patches"What are patches?" Patches are just a "fix" for the game and are completely optional, however they have benefits that you may want to use.
To get to the list of patches you will have to go up top and click on the "Patches" menu. There will be two more menus, ages and seasons. Ages contains patches only for Oracle of Ages, and seasons contains patches only for Oracle of Seasons. Once you click on a patch, it is applied. Sometimes you may need to click the re-apply ASM patches in order for a patch to work. Here are descriptions of each patch.
Ages Patches:Remove Forest Randomization - Removes the forest randomization caused by the fairies in the present over world.
16x16 Overworld - Allows the use of all the "X" or blank maps found through out the over world maps (including underwater maps).
Remove Beginning Locks - This patch removes the lock on the start button, allowing you to access your item menu. It also removes Nayru's kidnap event.
Crystal Switches in All Dungeons - This allows for those crystal looking switches to be used in every dungeon (the ones generally used for the raising of the red and blue blocks).
30 Chests per Overworld - This patch is actually applied automatically upon loading your ROM in ZOLE. What it does is adds 30 empty chests, for use, onto map 0 of each overworld (including underwater maps).
Seasons Patches:Remove Beginning Locks - This patch removes the lock on the start button, allowing you to access your item menu. It might remove Din's kidnapping event, I am not sure.
Remove Wagon - Removes the wagon off the starting area so it's not constantly there throughout your hack.
Wake Up Without Din - Allows you to actually change your starting map without having to re-add the interaction in which Din comes onto the map and finds you.
~~~~~~~~~~~~~~~~~~~~~~~~~~~~~
Editing ChestsFirst off let me get one thing straight. You
CANNOT add your own chests into the game. There is a limited number of chests, however its a high number and should serve you fine for whatever hack you are making. Second off, you
CANNOT have more then one chest in a room.
The chest editor can be found up top in the Tools menu, or by clicking the chest icon near the top. It also has a hot key of Ctrl+H.
To edit a chest you must be on a map with existing chest data, if you want to move chest data over to a different map simply go onto that different map open the chest editor and it will tell you no chest data is on the map, but ask you for a map to swap with. Map 0 of the over worlds contains 30 usable chests to be swapped over to other maps, so should you ever need one, simply go there. You can also use chests off of other maps.
The YX value in the chest editor is the actual location the chest will appear. You enter its coordinates in here, in YX form. You can find the coordinates by hovering over what tile you want your chest to be on, then looking at the bottom of the window where it says "X:" and "Y:".
Example: If you want a chest to appear at X:3 and Y:4 in the YX value box you would put 43.
The "ID" Value is the actual item that will be contained within the chest. There is no ID list as there is a lot of values so you will have to search for certain item values yourself sometimes, don't be afraid to experiment. Although there is not list of ID values, there are certain lists containing values for things such as all the weapons and ruppees. Make sure to check out the list section.
WARNING - Sometimes the game will freeze when you put a item in it and open the chest, this is generally because whatever item it is was never meant to be obtained by chest, an example being the level 1 sword. The program ZOCF (Zelda Oracles Chest Fixer) can be used to prevent this from happening, allowing you to place those items within the chest. There is a separate tutorial for ZOCF which can be found here:
http://zeldahacking.ulmb.com/index.php?topic=11.0~~~~~~~~~~~~~~~~~~~~~~~~~~~~~
Changing the Start PositionBy default you are set to "spawn" on map 8A whenever you start a new save in Oracle of Ages, but what if we want to change that? Well it's easily doable with the Start Editor. The start editor can be found in the tools menu, or by pressing Ctrl+T or by just clicking the Link icon on the toolbar up top.
There are 3 values you'll need to fill out, the map you want to start on, what map group you want to start on and the position you want link to fall onto.
The starting map is the first box, and the value that goes in here is simply the value of the map you want. You can find the value by going to that map and looking at the upper right corner where it says "Map: x" and just copying that value.
The map group box is the map group your starting map is found on, you can find this value by looking at the bottom of ZOLE where it says "Real Map Group: X" There are 7 map groups, and you can start in any one of them.
The last value is separated into two boxes, these are the
exact position you want link to fall on. The left box is the X and the right box is the Y. Now you should already know how to find the X, and Y of a tile however what about the exact X and Y? Well with exact X and Y the values range from x0 to xF (x being any of the regular values show at the bottom of ZOLE). You will find that x8 and y8 is the center of a tile, so you will most likely use those values, however you may want to experiment.
Example: If I want link to start in the first room of level 1, I would set the starting map to "24", the group to "4" and if I wanted link to fall at the center of the position X: 3 and Y:5, i would then set the first (left) bottom box to 38 and the second (right) bottom box to 58.
~~~~~~~~~~~~~~~~~~~~~~~~~~~~~
The Palette EditorThe palette editor is exactly what it sounds like. It edits the palettes of the tiles. To get to the palette editor you can go to the tools menu and select it, or press Ctrl+P or just click the little colourful square on the toolbar.
At the top right of the palette editor you have two boxes, one for preexisting palettes and on for changing the area ID that the palette editor will edit. Beside that, on the left, you will see a 7x4 arrangement of colour rectangles. Each colour can be changed individually to allow the user to make their own palette. By left click a colour, a box will pop up where you can choose colours off of a list or you can make your own custom colours via the "Define Custom Colors" button. Each colour rectangle will change a part of the tiles, you will have to experiment as to what box changes where.
When you are finished simply click the OK button, afterwards you will be prompted to clear cached images, if you select yes all the tiles and maps will be reloaded and you will be able to see what changes you have made. If you select no your changes will still be there, you just won't see them until you update the minimap or reload your ROM.[/list]
~~~~~~~~~~~~~~~~~~~~~~~~~~~~~
The Tileset EditorSo you know how to edit maps, change area ids and palettes and you even know how to edit palettes. Well what the heck is left to teach on map editing? Thats right, editing the tiles appearance itself. First lets get one thing out of the way, you
cannot edit a tiles collision properties, only a tiles appearance meaning, you can make the water tile look like land, but it will still be water.
Now how do we go about editing tiles? With the tileset editor of course. This can be accessed in the tools menu, or by pressing Ctrl+L or by just clicking on the dirt tile on the toolbar. Once clicked a rather large window will open containing the tileset of the map you are currently on, (found on the left side, it's really big you can't miss it) the tiles, (top right box, most likely looks like a mess, with some noticeable tiles in it) the editor itself, (right below the tiles) and the save, cancel buttons.
Lets start with the actual tiles (top right). To select a tile you simply left click a tile. You can right click and drag to copy a tile on top of another tile. Above the tile selector you will see palettes that you can edit your tile in, if you've edited a palette before hand it will be in there somewhere. Down below the tile editor you can you can see a "zoomed" version of the tile you have selected (left side) and the 4 colours you can edit with (right side). By left clicking one of the four colours you will select it. You can then left click a pixel on the zoomed in tile to edit the pixel. By right clicking a colour on the zoomed in tile you will select it for use with the left click.
*One thing to note is that you cannot recover edited tiles once you click the save button so do be careful.**Another thing to note is that to make sure you get the most out of tile editing and spend the least time possible, you should make sure that if your planned tile uses some parts that are reversed (horizontally, vertically or both) that you should just select the tile and check the corresponding flip boxes. Your edited tile will not change but when you place it onto the tileset it will have the transformations applied.After you have edited a tile you simply make sure its selected then go onto the tileset box (on the left) and left click to place the tile. If you ever want to quickly access a tile in the editor but can't find it because it's too messy you can right click on it in the tileset and you will select it automatically, palette and all. Make sure to save your changes, and you are done.
~~~~~~~~~~~~~~~~~~~~~~~~~~~~~
Miniboss (Dungeon) PortalsThis tool is really self-explainitory and has no difficulty whatsoever. When you open the tool you will see three boxes and you will only have to fill in two of them. The first one is the level you are changing the portal for. The next two boxes are just the maps that the portal will take you to and from. Change the values to that of the maps you want (found in the upper right corner).
~~~~~~~~~~~~~~~~~~~~~~~~~~~~~
Gale Seed Warp EditorWhen you open up this editor you will see a small recreation of the present overworld for ages. The black squares are the locations of all the mystical seed trees (locations you can warp to). You can switch from the present to the past by clicking the past circle underneath the map.
The index value is just to distinguish the different warps. By clicking the up/down arrows you will scroll through all the warps. You will see that the currently selected warp is surrounded by a red square.
The map value is the map the warp is located on. By changing it you will change the map you will actually end up warping to. You can see your changes in the model map above.
The dest. YX value is the position your character will land on after warping to that map in YX form.
The unknown value is well, unknown. I haven't really used the editor so I do not know but if you do feel free to tell me so I can alter this tutorial.
~~~~~~~~~~~~~~~~~~~~~~~~~~~~~


