NPC Tutorial
This page gives an outline of how one might make a custom NPC using the disassembly.
Tools used: BGB, LynnaLab, and the disassembly, with your preferred text editor.
This can also be done with ZOSE and ZOLE, but it is much easier using the disassembly.
Background Information

NPCs are interaction objects. They generally have two components: their assembly code, and their corresponding script. As a rough guideline, things that should be updated every frame are put in their assembly code, and sequences of events that occur over many frames are put into scripts.
In general, the NPC's sprite and animations are tied to the high byte of their ID. e.g., interactions $9400-$94ff use the same graphics. However, it is possible to set up new graphics for varying "subids" (i.e., the low byte of the NPC's ID).
You should preferably know:
Follow steps here for setup of the disassembly and LynnaLab.
Assembly Code
Basics
We'll start by utilizing an existing NPC and creating a new instance. This will be expanded upon later.
Open LynnaLab and select your current project; we won't be editing anything in here yet, but it is a helpful tool to locate used objects and to see their corresponding graphics. For our example, we'll utilize the "MUSTACHE_MAN" from Ages, ID $42.
Navigate to the related NPC's assembly code, located in the object_code folder, selecting which game you are using and opening the interaction folder, then finally opening the .s file that corresponds to the NPC as it is named in LynnaLab. For our example, we'll open object_code/ages/interactions/mustacheMan.s.
After opening, we will see the following code:
interactionCode42:
	ld e,Interaction.subid
	ld a,(de)
	rst_jumpTable
	.dw @subid0
	.dw @subid1
This branches out the NPC's code to its various subids. We could either create a new subid or edit an existing one. For this tutorial, we will create a new one.
We can create a new one just by adding .dw @subid2, as the new subid is $02. The corresponding label can be placed anywhere as long as it does not interfere with the existing code.
After dropping our label somewhere, the next thing to do is to go through the list of items we would want for the NPC to do every frame, or to do only once before its even started its script, such as initialization.
This is not the specific order, but the code usually follows this structure: Check if to delete the NPC Initialize the NPC's graphics, collisions, variables, and then script
We will present our finalized assembly code and go through each item line by line:
@subid2:
	call checkInteractionState
	jr nz, @@initialized
	call @initGraphicsAndScript
	ld a,>TX_0c09
	call interactionSetHighTextIndex
@@initialized:
	call interactionRunScript
	jp interactionAnimateAsNpc
checkInteractionState
As we would only like to intialize an NPC once, the disassembly uses the NPC's state variable to indicate whether the NPC has been initialized already. All objects start at a state of $00, but can be set at any time by any write command to its designated address. The checkInteractionState function only checks if the state is nonzero, but this is all we need it for as we will only use it as an initialization variable. The following relative jump command is the branch. Note that the state will be incremented in a future call during intialization.
@initGraphicsAndScript
This call is referenced by the NPC's other subids, and for good reason. This function initializes the NPC's graphics, script, and text high byte.
; initializes graphics
 	call interactionInitGraphics

; initializes collisions
	call objectMarkSolidPosition

; sets high byte of text for the NPC to read from
	ld a,>TX_0f04
	call interactionSetHighTextIndex

; loads the NPC's script
 	ld e,Interaction.subid
	ld a,(de)
	ld hl,@scriptTable
	rst_addDoubleIndex
	ldi a,(hl)
	ld h,(hl)
	ld l,a
	call interactionSetScript

; increments the NPC's state
	jp interactionIncState
Note that the @scriptTable only has two entries, as the NPC originally only had two subids. With our third one, we'll add .dw mainScripts.mustacheManScript2 to follow the naming convention of the previous scripts.
Once this call is completed, the NPC should be fully initialized and ready for us to create our script! However, if we want to set any other beginning variables, now would be the time right after this call.
call interactionSetHighTextIndex
This call is unnecessary since we already have a "bank" of text to use, which is from high byte $0f. However, for demonstration purposes, we will change the high byte to $0c so that the NPC will eventually utilize TX_0c09 when Link speaks to him.
We could also set any other variable for the NPC, such as change his collision radius, or set up a counter.
@@initialized
After we are finished initializing the NPC, all that is left is the typical functions that are needed to be run every frame for the NPC to work. i.e., running their script and animating them. As animations have already been set up via the data/<game>/interactionData.s and data/<game>/interactionAnimationData.s, we have nothing more to do in this rudimentary tutorial.
However, we will need to create the script that we set up during initialization.
Scripting
Moving on with the custom script, we'll open the file scripts/ages/scripts.s. Find the "INTERACID_MUSTACHE_MAN" section and add the label mustacheManScript2. Additionally, open text/ages/text.yaml and navigate to group 0x0c.
First, in the text file, add a new index below TX_0c08:
  - name: TX_0c09
    index: 0x09
    text: |-
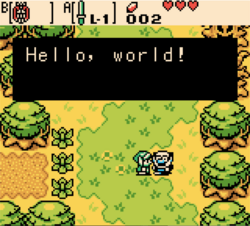
      Hello, world!
Back in scripts.s, we'll then add rungenericlowindex <TX_0c09, as the text high byte was already set previously.
However, if we don't want to have to set the high byte within the assembly code, we can also use a 3-byte command of rungenericnpc TX_0c09.
Finally, if we don't want a specialized script for the NPC, we can set up the NPC's script as mainScripts.genericNpcScript, which will effectively do the same as long as we set the NPC's entire text address during initialization.
At this point, we can open LynnaLab again, select our desired room, and create an interaction instance with ID $42 and subid $02. For additional assistance through LynnaLab and creating interactions, see Stewmat's YoutTube tutorial [1].